
Whether or not they have a decent interface (which is also important), the pics are often too small, and/or badly taken, and/or too few in numbers. I'm sure people who book shows or order puppets really appreciate good quality material to help them make a decision about what to purchase, and whom to book.
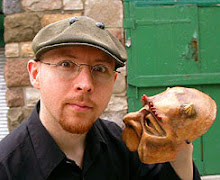
Example of a bad quality photo:

It was taken with a super cheap point and shoot camera, with extremely poor lighting conditions in the studio. These things were out of my control. I was working abroad and we were in a rush, so no time to get better lamps. I would not show this on a pro website.
Might as well not show anything at all. Alas, this set of photos is mostly so bad I'd have a hard time getting anywhere close to acceptable quality, even after lots of tweaking.
A poor photo that was improved a bit:

This was taken with a good camera, but in poor lighting condition, and without a proper neutral background.So the subject is badly lit, and the background is competing with it. This is what happens when we are too lazy to setup properly. I tweaked the pic to show what a big difference a little tweaking can bring.But save yourselves most of the tweaking trouble, just take the time and effort to take better pics! Of course, there are exceptions. I always try to take the best photos possible, but I do admit to neglecting it a bit when taking works in progress, especially if I know they won't be published online. Recently, that laziness came back to haunt me. A customer wants to use one of my "lazy" work in progress pics, on their event's poster. I think the photo and the work(at that stage) both look awful. I tried to dissuade them, but they held on to their concept. I hope they tweak the picture a LOT, to reveal less defects,as I suggested.
WHAT IS A GOOD PHOTO?
I'm not talking about photographing every single puppet in every single angle, using the services of a pro photographer. That would probably be overkill, and overly expensive to most. I'm talking about taking the time to make your puppets look their best in photographs, truest to what they look like in person, and/or on stage. It will inspire more people, and even bring you more bookings and more commission work. As a total fan of admiring other people's works, I truly enjoy when I see quality photographs of quality puppets. If you don't enjoy taking pics at all, you could exchange services with someone who does enjoy it, and knows how to do it. A lot of people have family members or friends who are pretty good at taking pics. I'll be sharing tips here (below) that could help beginning photographers become much better, in no time at all, with just a little effort. I know they work, I learned those tips the hard way.
My first puppet and mask portfolio dates back to 2001. It cost me over a hundred dollars just in film and processing. I really wanted it to look good,so I took many shots with my 35mm camera. It still ended up looking a bit cheap, as I didn't know much about doing good photography without the pro equipment I had been taught to use in College, but could no longer afford. Still, when I look at people's websites today, I see many photos that are just as bad as mine were when I spent so much time and energy on that first portfolio.
HOW TO DO BETTER PHOTOGRAPHY
WITH VERY LIMITED EQUIPMENT:
Maybe the large amount of poor photographs of puppets is because non-photographer people don't really know how to take better pics? Here are the bests tips I know, to help you improve your pics, if need be.Understanding and applying the following tips will turn the most unsure beginners into decent photographers, when using a good digital camera.I've seen it happen.Even if you can't afford a good camera, a "passable" point-and-shoot automatic camera will yield "pretty darn good" results, if you try some of these tips. You could even boost your possibilities when using your cellphone's camera! After all, the first personal cameras were something like a box with a pin-sized hole in the middle, to expose the film inside slowly.And people still got relatively good shots with those, with proper patience and technique. Today, we live in an abundance of powerful, affordable,easy to use photography technology, and we have all the required information online, and in books.Here's what works for me:
Camera
Get a decent digital camera of a good brand, with at least 6 megapixels of resolution. I recommend cameras by Nikon, Canon, and Pentax. Right now, I have a Pentax k100-D, and I love it. I chose it among other because it was the only full manual camera that used regular AA batteries as a power source.Proprietary batteries are a money-making scheme that makes it very inconvenient to get replacements (special orders), especially on tour or trips.So that's why I took the extra time and effort to find a camera that worked with regular batteries.
But you don't need to spend 600$ on a camera to get good shots. Maybe 200$-300$ would be an acceptable lower price range for puppet companies who want real good quality. This is the only "expensive" investment in these tips. Using your camera's Manual Mode (if it has one) and knowing how it works will save you a lot of headaches, and give you total image control. I was stubborn with my first digital camera, and waited for one year before really reading the camera's instructions manual. I realized only then that I had been missing out on a lot more picture quality! It suddenly felt like I had gotten a much better camera. Still, knowing the options on your automatic modes will help you get better pics, every time, by choosing the right mode for the right lighting situation. A good capacity removable memory card is a good investment. It is very frustrating to run out of card space when everything else is going right. An extra card can't hurt either. Usually, the card that comes with the camera is nowhere near a decent capacity, so spend the extra 30 or 60$ to get a large capacity card at the moment of purchase of the camera (some places will give you a rebate if you ask for it at that big purchase time).
If your camera is one of those pocket-sized extra lightweight, it could have a stability problem, making your shots fuzzy. A friend of mine has a much better resolution on his camera than mine. When I use his camera, even with all my tricks, I find it near impossible to get a good shot without a tripod. Adding a bit of weight underneath it (using the screw hole meant for attaching to a tripod) would help stabilize it when not using a tripod. This inspires me to build him such a weight device as a gift, or at least a rope tripod. The git is for me too, as I am his usual graphic designer, and his fuzzy pics are slowly making me lose my mind.
Camera settings:
This will vary a lot depending on your camera and lighting conditions/equipment. To make things short here,I'll give you my preference for best sharpness and finer grain. It will differ for many people, so experiment. White Balance: adjust according to your lighting types ( Incandescent, Fluorescent, Daylight, etc...) You can also play with different light types in the same pic: daylight is more blue than incandescent, for example, so in the same image, you can have sunlight from the window on one side, and a lamp on the other.
ISO: 100 or 200 (finest grains on most cameras) . You'll need more light in the studio for this ISO setting, and you'll need to close your aperture if working in bright outdoors condition. Aperture: as low a number as possible without losing depth of field (the smaller the subject, the less depth you need to have everything in focus). For my average sizes, I open the aperture to the max (lowest number, in my case 3.5)Picture quality: as much as you need. In my case, I use the maximum format as possible without it being RAW, which would be overkill, since it does not change the pic quality for my uses. A full quality JPEG from my 6 megapixel camera can probably be printed tabloid-size without any loss of sharpness, which is more than I usually need.
Tripod
You absolutely need one if you want really sharp, focused pictures with all the details. It also saves us in limited lighting conditions, because it permits stability during longer exposure times. Anything stable will do. You can even make your own, by adding proper hardware (quarter inch bold and three hex nuts) to at all piece of furniture. Still, an actual tripod with adjustable angles will be very practical, and portable. My main tripod is an old video camera tripod, from which I removed the super strong spring which was for stabilizing heavy video cameras. Now I can use it for my digital photo camera without needing superhuman strength.
Lights:
Digital photo cameras are very needy in terms of light, no matter what mode you use. Yet it is even more important if you use the automatic modes, because it will try to compensate in lack of light, and give you very grainy images as a price for versatility. Get one very strong light source, and two or three medium strength sources. That's for studio work, and to control your environment better, either work in a room where no outside light can come in, or work at night with curtains closed. When working outdoors, use what sunlight is available, and better yet, go take pics at times when you have the best type of light for the project you have. An overcast but bright day is really good for a diffused light situation, it will cast only soft shadows.
I like bright sunlight too, but for those moments, I'll take my pics slightly in the shade.
Note: Winter temperatures will make your camera's batteries temporary feel drained, very fast. They will regain some of their vanished charge when they get back to comfortable room temperatures.
My main light source is a halogen work light, with twice 300W bulbs. My secondary sources are two desk lamps. In one I put a 100 watt bulb, in the other, a 60W. Some people are very happy with using colder light sources, such as fluorescent. They cast a more even diffused light, which can be very flattering to most subjects. I don't yet go for those, because I hate their blueish cast, and the headaches that they sometimes cause. The blue temperature of these lights are not seen on the final pics, as most good cameras have a light temperature adjustment, and/or you can use a photo software to correct it.For now, I'll keep with my yellowish incandescent lights, and just be careful when handling them, as they get pretty hot.
Should I use a flash?If you can avoid using the integrated flash into your camera, please do so! An integrated ruins most shots,by flattening volumes, inventing textures, and making everything look bad.You don't need a flash if you have the light sources (or similar) mentioned above. If you have an independent flash you can position anywhere and still work with your camera (pricey!), you can use it instead of your main light, with great results. If you must use the integrated flash, diffuse it by placing a white sheet of paper in front of it. play with distance and angles to see what works best for your subject. Be careful, the flash's light often bounces off the sheet into your eyes, so better close them at the last nanosecond.
Reflectors:Any large opaque white (or other light color) panel can be used to bounce some light into the shaded areas, so as not to loose details and definition. Different surfaces will give different effects. Lots of people like to use white Foamcore, because it bounces light softly. Many white surfaces will work.For even more reflective power, some shiny metallic surfaces are very helpful. Car window reflectors(one side gold, one side silver) have been adopted by many pro photographers as cheaper alternatives to the studio product.
Backgrounds:
I use a black Theater curtain for most of my puppet and mask pics. It's always set up, I use it to splits my main room into two. It will also make a great background for videos.
I love it because it blocks all the street light, I can sleep in near total darkness. Best investment in years! Sometimes I'll use a white panel as a background. For very small objects, I'll use a home made light tent. Many tutorials are available online for free, to build your own light tent. It makes a world of difference to have those two walls and ground all white, bouncing the light all around your subject. You also need less light when using the light tent, and it can serve as a light diffuser if lit from behind. I also like to go outside and use various natural or human-made settings as background. I take those as extra shots, and as a fun artistic activity, but I still take the controlled studio shots.
Filters:
I don't use special effect filters, as I want sharpness to better represent my creations. Less is better. I would however sometimes use filters and attachments that enhance the clarity or quality of my pics,if I had any. Examples: macro filters, basic color filters to bring out or eliminate a certain color range.For artistic shots not meant to feature the puppets in precision, anything goes: nylon sock over the lens(or other material), blowing some condensation over the lens for a few seconds of blurry fog effect.
Setup:
Main light source is usually set higher than my subject (think "like the sun"), either hung from a wall,installed on a tripod, or on my sculptor's trestle, pointing at my subject. Experiments are necessary to see what is the right distance for the ideal light level without having a hot spot (which would destroy details in lighter areas) My secondary light source is set on one side, at about a 45 degree angle,pointing to my subject. If I have a third source, it's set anywhere I need it, but further away from the subject, to make it softer. It's called a "filler". A filler can also be used behind the subject, to light the hairs, and make them visible against a background that would be too close in color to it. My camera is set (usually on the tripod) at the best angle to see the puppet. Usually for me, that means I center my subject in plenty of empty space around it. I take my pics at full quality (although not RAW, which I don't need) a bit further away from my subject, to avoid lens distortion. I can crop closer(removing extra frame) in a photo software later.
Taking the shots:
Using a tripod:
when everything looks good in the viewfinder or the LCD screen, just press the button.If the tripod isn't all that stable, use the delayed shutter release, so that it will have time to settle between the button click and the shot being taken. I use the multiple shots options when I can't really use a tripod. It takes more than one shot every time I click the button. So even though I move, one of those shots is probably more focused than others. It enables me to select the best, sharpest pic of the bunch. Holding my breath before I click is also a good way to limit unwanted movements. Some people like to use a rope tripod, which is very simple to make. Here's a tutorial on making a rope tripod.
Judging each shot:
Get used to how your camera's LCD screen displays your photos, and know how to preview the pics, and zoom them to the max. This will help you judge to see if you have proper focus, light, and sharpness, letting you know if you can move on to the next subject, or take extra pics for safety.
Transferring the pics:
Use your camera's cable or a card reader if you have one on your computer.
Processing the pics:
The first step I do is to rotate the pics so that they are all upright, as they were intended, if the camera doesn't do it automatically (mine doesn't). Some free software are available for this. I use Rota, which does it without any loss to the picture quality. It doesn't say so, but it only works well if less than 100 pics are processed at a time (otherwise, some of the later pics are not processed). Then I take each pic at a time into a photo software (Photoshop, Photoshop Elements, The Gimp, etc), and adjust the levels, add a bit of saturation, a bit of sharpness, and eliminate defects, such as dust particles, distracting reflections, and even gadgets I might have used to hold the puppet in place for the shot.
I rarely resize a pic at this stage,as I want full size and resolution fro my archives. But if I do resize, I do so under another name, in another folder, to keep the good stuff good. Every time I resize, a subtle application of sharpening is required,otherwise you lose some finer details and textures. I save each pic under a clear, recognizable name, in a different well-named folder. These are ready for printing. But I also use them as originals, to make my web version and photo montages from.
Converting for web use:
Depending on the destination of the pics, you can choose what resolution you give them. Some online services such as Facebook will reduce your pic sizes automatically, so don't expect huge full screen pics. Better host your best work somewhere else, and link to it. Most website pics are still at 72 dpi of resolution,although some are at 79 or 96dpi. These are good resolutions for screen viewing, if the pic is big enough in pixels to see the pic clearly. It's safer to use this resolution, unless you want people to start printing your full resolution pics for their own "not always legit" use.
If you want to risk it, you can post full resolution pics (300 dpi and up) to your own advantage, like when you want customers to print your posters themselves for an event, or for press purposes, so they can display the best quality possible in their article or TV show.
A full resolution is also much appreciated when you supply free stuff to print out, such as patterns.My current average single pic for the web is at 72 dpi and is 700 pixels tall, and as wide as the screen allows.For a photo montage (portfolio), I try to use a size of 800 x 600, as it fits within most browser's main window without the need for scrolling.I hope this helps. It sure helped me.I get more bookings since I have better pics.With the first portfolio, some people commented online about such and such puppets, and a few months later, when seeing them in person, they had forgotten they had seen them before.People now remember my puppets from the pics, which is reassuring!
EXAMPLES:
Here are a few websites that pop from memory with awesome pic quality and ease of navigating. I never forgot about these sources of inspiration:
Ronnie Burkett
Michael Curry Design
Craig Denston
Kim Graham, sculptor
PHOTO CALIBRATION SERVICE
If you are in a hurry, or just prefer to have someone do it for you, I can calibrate photos for you.
Contact me with an example of what photos need to be done, for more info and pricing.

2 comments:
Thanks for the great tips! I'm always looking for ways to improve my photo skills (other than buying a better camera!)
On a different matter, I came accross a forum about prop maniacs who share techniques and project pictures.
It's called the Replica Prop Forum (http://www.therpf.com)
I admit it's mainly focused on sci-fi props and replicatings prop opposed to invent new ones, but I tought you might find it interesting.
You're welcome, and thanks for the link!
Post a Comment