Creaturiste's Laboratory

Techniques, works in progress, and everything that doesn't fit in the portfolio. Comments and questions are encouraged, custom orders are welcome!

Monday, July 11, 2011

Evil and Deformed


Unless I decide to alter some of their features, both of these oil-based clay mask forms are ready for mold making in silicone and plaster.

Both are part of a commissionned series of Character Masks for an Actor Training class, but they will make a good addition to my Halloween selection.

The devil is based on my own face, when doing my imitation of the scariest evil face I can muster. The Deformed man has canine and porcine sides to him. As such, I hope he is a vegetarian.

It took me about 16 hours to model the Devil, while the Deformed took about 8 hours, since I improvised most of him, starting from the Old Man from the same series of masks. For me, Likeness takes longer than improvisation, as I have higher expectations for accuracy.

Sunday, July 3, 2011

Making Paper Pulp

To make pulp, just tear cotton linters, or wood-based papers, or pulp packaging material (like egg cartons, but use only clean, unsoiled cartons) into small pieces, put them in a tall bucket, use a mixing attachment on your electric drill, and spin until as smooth as it will get. Then let soak for a few hours, and repeat the blending. This basically acts like a giant blender that separates the fibers without cutting them shorter.

Some people like to use a blender with a lot of water, one handful of pulp at a time, but it's tough on the motor, and it cuts the fibers even shorter, making it a weaker pulp.

Using a sieve, drain the pulp a bit, then finish with your hands to remove all the water that will come out. Store in a clean, airtight container in the fridge, for only a few days.

If you want a smoother result, or if you're not sure of the cleanliness of your pulp, boil it in water for a few minutes, let cool, then wring out and store in an airtight container in the fridge.
If you need to store your pulp for a long time, flatten it into sheets, let it dry fully on a clean towel and in front of a fan or in the sun (not directly on the ground or near bugs), then store as you would sheets of paper, in a container, away from dust.

When you need to use again, just break into smaller pieces, soak and blend. It will be faster than the first time.

For a smoother version, to use as a detail coat over a stronger pulp, you can break the pieces even smaller, and pulverize them into a powder, using a coffee grinder. Be sure to let the dust settle before opening it again.
I give credit where it's due, for this method, to David Osborne, in Great Britain.


I'm partial to cotton linters, for the strength of the paper it produces, and for the very simple way to prepare the pulp from those easy to decompose sheets.
I've gotten a sample ( a bucket) of wet cotton pulp from a paper mill, and it's bloody heavy to carry, on a bicycle. The same quantity, in dry form, would have been a breeze to carry, just like a sketchbook.

Still, cotton linters are not easily accessible to me, so I'm experimenting to see if the strength of boiled wheat paste, well-blended into newspaper pulp, will be enough for may puppetmaking and maskmaking needs and criterias.

See my preliminary results for pulp mixed with clay powder:

Cast Pulp Masks

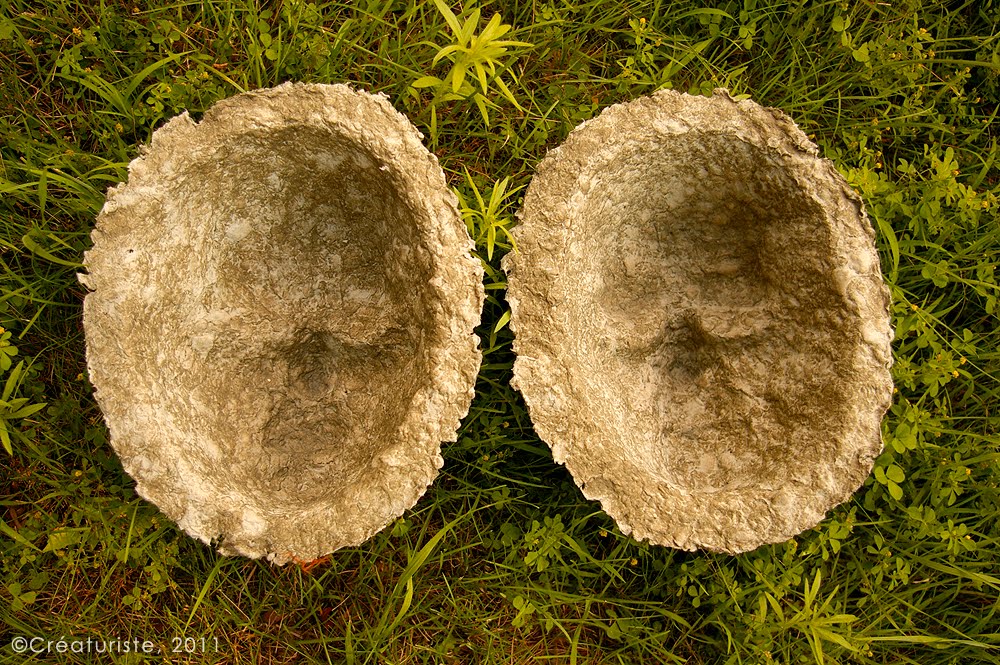
I've been experimenting with making my own version of Celluclay, and I think I've got it finally, although it's not my version. It's everybody's version, because I had a lot of help in making it work.

I did a first cast (first photo above) with an egg carton type of pulp, pressed wet and flattened with a sponge, to remove the moisture. Then I painted some boiled wheat paste over it, because I noticed it was going to crack and be weak.
It took a long time to apply, and a longer time to dry, some definition was lost, and the result was a little bit weak, but I will be able to strengthen it with paper strips as I had planned.


EXCITING RESULTS

Then I was advised to add clay to the mix. Wow! It feels, behaves, smells, dries and looks like Celluclay!

It took me no more than 15 minutes to apply the pulp into the silicone mold, compared to at least 45 minutes with the sponge methods with the previous batch.

The picture to the left shows you a detail shot of the results, the following pics are from the same recipe with clay.
Better definition, better detail, better smoothness.
It dries a bit faster too, but it's twice the weight compared to the pulp-and-paste version. Still well-within acceptable limits for now. I will see when the masks are strengthened, sealed, and painted. Thin spots can be detected by placing the mask in front of a strong light source, and it can be fixed by adding more pulp until no more light is showing. Drying this quickly and thoroughly is very important to prevent warping.

I will trim each mask, cut out the eye and nostril holes, add a wire rim around the mask's edge, and re-seal all cut edges with paper mache strips and boiled wheat paste. When fully dry, I will sand it where need be, seal with multiple coats of white shellac until water proof, then prime, then paint, then varnish.

NOTE
Click on pics to see the yummy texture!
For years I was striving to make smooth paper mache strips, and when I succeeded, I realized it was not always a good thing to have the smooth perfection. sometimes it's just too perfect, too boring! Pulp has its own "living" texture, which is why I always come back to trying to make it work, in hopes of saving time and getting that wonderful subtle texture. I succeeded this time, with help, and I can feel the end result will be even better.


RECIPE
The measurements are very estimated, because I eyeball everything, and go by feel, but this should work for you too. To make pulp, see this article.

•5 cups of wet pulp, water almost all squeezed out (wood paper based, such as newspaper or egg cartons)
•One cup of boiled wheat paste
•two cups of clay powder (I used pure green clay for facials, found in a health food store. White clay would work just as well, and pre-mixed potters clay would likely be ok too)

Mix the clay powder into the wheat paste until smooth, then incorporate into the pulp until smooth. If too thick, add little more wheat paste.

To cast with this using my silicone molds, I made my mix into more of a grout than a "clay", so it was easily patted down in place, then flattened thinly into my mold, using a thick Cellulose sponge to aborsb the moisture and flatten the pulp. I use a smaller piece that I cut out of the sponge, to make access easier for smller areas. Try to avoid sideways movement, as it can pull the pulp and tear it. Every squeeze's water accumulation is squeezed out into a bucket. It also shows me how much water I was able to extract, and may indicate if I should make the next batch more or less liquid.

You could use a latex mold. For a plaster mold, you'll need to seal it well to prevent the pulp from sticking to the plaster. White petroleum jelly is often used, but I prefer to use a soap based sealer. Next batch of the paper-clay, I'm going to try to reduce the amount of liquid, to see if it will reduce shrinkage. My first two masks with this recipe turned out well, however. Look for yourselves!


The inner view shows an irregularity in color. I suspect it might be the clay needing to be mixed better with the pulp.


Upcoming experiments:
Newspaper pulp mixed well with boiled wheat paste. No clay this time. My hope is that I will get the same definition, without the added weight that clay brings.

UPDATES:

•I made three new casts, using the newspaper pulp instead of the egg cartons.
I boiled the pulp as a precaution. I saw the inks separate from the pulp. Kinda weird.
My mix this time included clay, but more paper and wheat paste than the previous batch.
Because of this, it was a more cream-like consistency, and was faster to apply, but was too liquid for reasonable dry times, and I was afraid of extreme shrinkage. so I got a new Cellulose sponge, cut a smaller piece off of it to make it easier to get into the mold details, and started pressing the moisture away. What a difference it makes to have a high quality sponge that's thick enough!
Pressing without moving sideways is very important to prevent tearing of the pulp. Some of it will happen anyways, so add more wet pulp and press it down with the sponge. Invisible seams!
I was able to remove between 1.5 and 2 cups of liquid with this method.
I already have a smoother interior or the mask, the wall will be thinner, and the drying times will be reasonable, I can feel it!

•I added a coat of wheat paste over the first cast of the three eyed mutant, since that first one's pulp was not mixed with wheat paste, just painted with it once it was inside the mask. It will help keep the texture intact when I start surface smoothing.

•So far, I will have at least 4 new masks for sale before the end of summer.
I'm very busy, but if I wasn't, I'd be rushing the finishing of the mutant mask, just so I can feel the fun of painting it!

•Now that all the casts are dry, I was able to compare them (unsealed, no added paper strips or wire contour). Cotton pulp +wheat paste is the strongest, lightest and thinnest of all the mixes. It also shows less shrinkage and the texture is acceptable. Adding clay to newspaper or egg carton based pulp (with wheat paste) adds hardness and weight, but not much strength against crushing or impact. All mixes work good for display items, but for performance wearable masks, none meet my criteria as-is. I will add strips to the weakest of the casts to see if it's worth the effort.


• I added two layers of Kraft paper strip to the newspaper pulp casts of the masks, and the added strength is surprising! With the wire outline, I have a feeling these masks will be up to my standards of durability. The kraft I used this time is thin, likely the same that lunch paper bags are made of in Canada and the USA.
I crumpled and soaked and wrung out the water from the paper, to soften it before use.
I have added pulp over strips before, and it works so long as the strip project is strong and stable.
Yet I had never fully successfully cast pulp by itself before, as each cast required major "surgery" to look good. Now, with just newspaper pulp and boiled wheat paste, pressed down wioth a thick cellulose sponge to remopve all mositure that I could, I have succeeded. The strips stuck well to the dry pulp cast, but I made sure of that by rubbing a very thin coat of wheat paste all over the cast prior to adding the strips. Adding anything to a non-sealed paste-based project can temporarily make it soft again, so I was careful and placed the casts back into the molds, for safe keeping until dry enough again (in front of a fan for a few hours) to stand on their own without warping. Careful extra drying is done once release again from the mold.
I will report back when the first mask is fully assembled, dry, sealed, and put throuh my vigourous testing.
Perhaps before...

...
Told ya!
Three of the casts (the two newspaper pulps and the one egg carton) are now trimmed, edged with wire, and have an extra layer of Kraft paper over the front.
I love the subtle texture even more now, and it's not even sanded down yet.
Semi-dry, i can already tell these masks are very strong.
Sealing them with shellac will only increase their durability.
Photo here:


• I made two new casts, still using the newspaper pulp and boiled wheat paste, pressed down with the cellulose sponge. I decided to try applying the pulp as thin as I could without seeing the mold through it once sponged. It works even better, dries faster, and weighs less. Of course there are more tiny holes that you can see in front of a lightsource, but these will be fixed with the two layers of Kraft paper inside, and one on the surface of the mask. I feel like I am getting close to a favorite way of doing paper mache masks. Faster, better resolution, just as strong as my all-strip masks? It's all goooooood!


Friday, June 24, 2011

Ambidextrous mouthplate


Hello all.
Over the years, the frequency of puppets requiring mouth plates has increased in my production. I've been trying different types of mouthplate materials, and I really like one material above all else for a hinge material: nylon webbing (backpack straps). This article shows what I do with it, to make a mouth plate.

The design is symmetrical, and can be worn on the left or right hand. Very comfortable, if glued well-aligned with the mouth. The center zigzag stitch separates the hand grips in half. This piece was a test, and was removed because I messed up the alignment in the puppet, and the side stitches flaring out were not easily flattened down. Look below fore a better version of stitching the sides. This one is not made of nylon webbing, but it is a similar looking product, I think it's a natural fiber.

Pros: very strong, one piece, won't un-glue itself.
Cons: only works for lightweight puppets that don't require a finger grip (like a half ball).
Be careful to give enough space for fatter fingers than your customer's, just in case.

I started using this marvel stuff years ago, after having problems with a leather mouthplate stretching out of shape and ungluing itself because of extreme moisture in the air. Nylon webbing doesn't seem to stretch at all, won't rot, and doesn't seem to get brittle. It accepts hot glue wonderfully, but it drinks in contact cement a bit between its weaves, so we need to use several applications before proper surface contact is achieved. The contact cement stiffens the hinge area, so don't put any where it will bend.

More often than not, I can't find the webbing in a wide enough variety, so I use two or more next to each other, to create the proper hinge width. I nowadays zig-zag stitch them flat next to each other, using the sewing machine. I picked up that trick from a customer who is very good at sewing, when she learned that I was going to have to use the narrower webbing for some puppets I was making for her. Been zigzagging it ever since! Once stitched, the hinge is measured within the head, marked, and trimmed. The perimeter is zigzag stitched twice to prevent unraveling. Might not be necessary, with the contact cement later, but I prefer to play it safe.

The webbing can be somehow uncomfortable at the edges, so once installed in the mouth, covering with a soft but durable fabric will increase comfort and durability. Sometimes the design requires finger tubes, so I make these out of the same nylon webbing, but make sure to machine stitch it flat, then loop the lengths on both side up and hand-stitch them together once I have the required fit. Be careful not to stitch too thickly where the webbings link with each other, or you'll have an uncomfortable bump.


The middle finger is free to operate one of my eyebrow triggers.


What an actual nylon webbing hinge looks like before it is stitched together flat. The webbing I had was narrow, so I zigzagged three together (brown stitches in the center). The pins show where the zigzag stitch must be well done to ensure durability. Avoid over stitching into lumps though. The "legs" are joined together, trimmed to size, once measured, then their edges zigzagged to prevent unraveling, then each tube is hand stitched together. An extra stitch is done over that to split the hand grip in half, if necessary for the design (see first picture).


Bonus Tips:
•Nylon webbing can be made into puppet hair, by simply unraveling it. Usually, it unravels only in one direction. Some weaves of nylon webbing don't unravel in any usable way.
•Using a waterproof fabric inside the foam puppet's mouth will enhance the durability.
I made a puppet about two years ago that has a liner of umbrella fabric. It's lasting to this day.
It might be sluippery with sweat, so be sure that you have a good grip as part of the design.
I had a half ball of closed cell foam as a finger grip on the upper mouth plate.


Monday, June 20, 2011

Simple rod marionette control


I made up this control really fast, to replace the fragile (and broken), overly complex control that came with a rod marionette my customer brought from Belgium.
The marionette itself was well built.

I had to simplify the system so that amateurs could make it move really well, at first. So I made it in one piece, no movable parts on the control.

The handle is a piece of pine.
The horizontal extension is made of two pieces of hardwood, which I cut from the bigger paint stirring sticks I found at the hardware store. I love those! The are pre-pierced to prevent splitting, glued in place, and screwed as well. The screw eyes are inserted with a bit of glue, until their base sinks a bit into the wood, to make sure the strings will never grab or escape. Their ends that poke through are cut flush with the surface. All the screw heads are covered with epoxy putty.
The control parts are filed and sanded smooth while still separate.
Another step of sanding and filing is done on the assembled control.


Only two strings operate the arms and legs.

The leg string goes through both screw eyes at the top.
The arm string goes through the single screw eye.

Because I didn't have the time to replace the rod, I had to break the old control off of the rod, and build my new control over the existing, already-bent rod.
this meant I had to carve a channel into my wooden handle to snugly hold the rod in place.
I then filled it with epoxy putty (plumbing grade). I like the one from PC products (USA), because it is very strong, and cures well within 20 minutes.
Once applied, you can smooth epoxy putty with a bit of rubbing alcohol on your gloved finger.
When cured, a filing and sanding can be done to achieve a seamless result.

I painted the whole control with a glue-based black paint of my own composition.

Neat feature:
Grab leg string, and the opposite side of the arm string, then activate the legs.

This makes the rod marionette walk with the natural opposition of arms and legs (left arm raises as the right leg does same).

Neat Marionette Joint


Yesterday, I had the chance to make a new control for a rod marionette from Europe.
I don't get to see those often, and every time I learn something new.

This time, on the Pinocchio puppet, I noticed the simple yet sturdy system the artist (unknown, probably from Belgium) used for the knees and hips.

Instead of the usual hole in the wood, where the axle can and will enlarge said hole, they made a groove on top of the piece of wood, inserted a piece of thick wire to cover the groove, used an axle on the other piece of wood, which links up to the initial piece by going under the metal wire.
Metal on metal is strong. It's a little bit squeaky though. It was barely noticeable on the Pinocchio.


Monday, June 13, 2011

Inspirations for Abundance

I often recommend these sources for inspiration.
They all helped and are still helping me better my life.
I dedicate this article to all artists, who may have been struggling with money and abundance.
Let's fight the clichés and unproductive, self-destructive beliefs.
The age of the Starving Artist is over!
These are resources I found and still find very inspiring in my life, and
work.

Free audio book of The Science of Getting Rich
http://www.archive.org/details/TheScienceofGettingRich
(I listen to the audio, but I also have the actual book, to carry with me).


Think and Grow Rich (book)
by Napoleon Hill
(I'm still reading it for the first time, not even halfway yet, and already
it's very useful)
http://www.amazon.ca/dp/1585426598


For energy and connection inspiration, the following movies (both based on
books) are very uplifting:

The Celestine Prophecy
http://www.thecelestineprophecymovie.com/

Peaceful Warrior
http://www.peacefulwarriormovie.net/

And for the importance of myth, there's a superb documentary, which uses
stop motion puppetry (puppets made by Wendy and Brian Froud) to illustrate
some of the myths:
Mythic Journeys
http://www.mythmovie.net/

About the law of attraction
(Developed within the two books named above)
Every time I focus on it, even just a little, I get demonstrable results. Just last night, I found 7 "banker's boxes" I needed for better storage and order, for free. I had been thinking I needed them just the day before, and told myself I WOULD find them.
Wasn't even looking for them. Works for small things, and bigger things, including events.
Let's make this a habit, and grow abundance for all!