


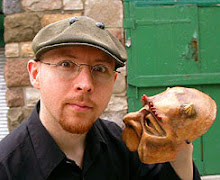
Full-head portrait mask of composer Maurice Ravel.
Surprise for the show: skull opens at hairline.
It's finished.
I'm very happy with the result.
So are the customers. The mask works better than they expected, and since the actor is a trained mask actor, during the handing-in meeting, we had a feeling there will be more mask play during the show than originally planned (actor was supposed to wear it just to exit at the end of the show).Materials: Paper Mache Bark, Paper Mache Strips, Wire, Weldbond, "Monster Bone", Metal Hinge and hardware, Acrylic Paint, Metallic Powders. The look is exaggerated Bronze and silver. The colors are not quite right in the pics, despite the attempts at adjustments. I find it hard to photograph the proper color temperature of Metallic powder finishes. Any lighting tips for me, using household items?
The features and texture are much bolder than usual, because this is designed for the largest audience size I've ever built for. It needs to be readable from afar. Customer: two contemporary full orchestras performing in one evening. The mask will be used as a puppet head, and finally as a mask, by the actor hosting the event, giving life to Ravel between musical pieces.
The actor wears the mask without the risk of the scalp opening by itself, thanks to wedges of polyfoam circling lower than the cranium "fracture". Each wedge has a surface of fun foam, being sweat proof and more comfortable than polyfoam.
The scalp remains closed simply by gravity, and stays put, thanks to the hairline draping snugly over the head, for a centimeter.
This head will be used mostly as a puppet head. The actor will build a rudimentary body that will be hidden under the bedsheets of the hospital bed. The head is just placed on a pillow, which has a hole in the middle, to allow the actor to open the skull, reach into it, and fetch objects hidden within the table or pillow. At one point of the show, he dons the head as a mask, and become Ravel, walking off the stage.
When I tested the possibility of moving such a big mask-puppet-head, I found out how much movement one can get by using a pillow underneath. Very expressive, from very subtle to very extravagant. My own pillow is foam latex, which reacts even more subtly, kind of like body fat (remember that medical examination scene in the movie The Santa Clause?), but a regular pillow will work well too.

5 comments:
Very cool! The texture on this piece is just lovely. One of these days I need to try out your recipe for Monster Bone!
Just try it now.
By the way, there isn't that much Monster bone on that guy.
Just a softening-unifying layer, which doubles as a basecoat.
The rest is all paper (paper mache bark, + smoothing layer on the face area).
hello...looking for a little help in creating a mask for halloween...have an idea, want to know what you used as a base for your full head portrait mask:ravel...in other words how do i start??..i want to achieve the same outcome as you did regarding size and it fitting over my head...blah blah blah...
any suggestions would be appreciated...
thanks...babs
Hi Barbara,
The base for the mask was a copy of my head, made of duct tape. The method to make one is easily found online, if you look for how to make a duct tape sewing dummy, only you appply the method to the head. Then I attached a bicycle helmet that fitted my actor's head. It was useful in enlarging my head size fast, and make sure it would fit the wearer once I inserted the helmet inside the final mask.
This mask could not use a helmet however, because of the opening cranium. so I used wedges of foam instead, covered with fun foam, to make sweat-proof and comfortable. The rest of the head was sculpted using newspaper and masking tape, in many different kinds of bunched up shapes. The resulting head was covered in plastic wrap, to have a clean release once I cut the dried mask out of the form. The cut is to separate the whole head in half, left and right. Immediate;y after releaseing fromshape, the mask must be re-assembled with more paper strips. Holding the mask together with masking tape is what helps do a good job. I attach the paper strips between the strips of tape, and when dry, I remove the tape and add paper there.
Make sure to re-seal every single edge you could in the paper mache, by adding more paper over the edge. This will prevent warping. It uis absolutely necessary for a sdurable mask. I had a nice pumpkin mask warp so much, a few years ago, that the large open mouth became a closed mouth, just because I neglected the sealing of the cut edges. The whole method has been applied to other masks, and I wrote about it on this site. Check out my large skull mask, which has all the descriptions, I believe.
Make sure to consider the Paper Mache Bark method, which saves me at least 8 hours, compared to the strip method.
I hope this helps.
.
I forgot to add the important point of mask opening. For overhead masks, especially fully rigid ones, you need the opening to be large enough to allow comfortable inserting of the head into it. Pay special attention to the area that might touch the ears.
I've seen one instance of an overhead mask that had to be made on hinges, so it could be inserted over the head, and not have a large area below. Then again, it might have been a helmet from an armor.
Post a Comment